I'm so excited! I've finally found the perfect math site for my boys. The college kids who started the site deserve medals! The videos are short and sweet and somehow put even the most complex math concepts into terms the kids can understand. I had been using IXL.com for the last several months, but I don't like that it's mostly a type of review - like a worksheet just on the computer. THere are no lessons or real interactive information, so I was still somewhat at a loss on how to teach my oldest son - the audio learner - math concepts. He was stuck at about 3rd grade, he couldn't remember multiplication tables so we've gone back to the several times with no success. But after watching their video on Khan he went through their practice sheets like he'd been doing them for years! He just suddenly got it!!!
If your child is an audio learner like my 9 y/o you may also be banging your head against a wall. Math is all about working things out on paper (for the most part) and audio learners have close to zero attention span for paper work. BUT I found this great site that's TOTALLY FREE and has video clips explaining every aspect of math in ways kids can understand!!!
Khan Academy
Friday, March 11, 2011
Friday, March 4, 2011
Mummies, Mummies, everywhere!
I have found some great projects for Xman's Egypt presentation. One of the ones we are doing today? Making mummies. We bought some WWF guys (they were bigger than GI Joe) and we'll be using an apple. Since we can't dessicated (dry out) our toys, we will simulate that step - but to get the point across of what this step did to human bodies we'll be doing it with an apple slice.
First the kids used this Interactive Website - How Mummies are Made
Apple Slice Dessication -

Steps to Making a Mummy -
Step 2 - we pretended to remove the organs
Step 3 - we covered our 'body' for 40 minutes (1 minute = 1 Egyptian day)
Step 7 - we had to simulate since our dolls didn't have fingers and toes.
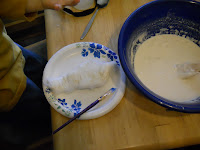
Step 9 - We sealed our linen with a home made version of Plaster of Paris - 1 cup warm water and 2 cups flour (we made sure our mixture was a bit more watery than regular glue so our cheese cloth strips could be hardened.)


First the kids used this Interactive Website - How Mummies are Made
Apple Slice Dessication -
- Cut an apple into quarters.
- In a measuring cup, measure 1/3 cup of baking soda, fill the cup the rest of the way with table salt.
- Mix the dry ingredients - this is very similar to Natron, the compound used by the Egyptians.
- Place one apple quarter in a jar or cup
- Fill the cup with the salt mixture, making sure the apple is covered completely.
- In another cup place another quarter of the apple - leave it uncovered (this will show the comparison in decomposition)
- Place both cups in an out of the way place for about a week.

- Delivery of the corpse for mummification
- Removing the Organs. The heart remains in the mummy, the brain is destroyed and removed through a nostril, the stomach, liver, lungs and intestines were washed and placed in Natron for dessication - these preserved organs were each placed in a special jar called a Canopic Jar which is sealed with a carved top representing which organ was inside.
- The body was covered in Natron for 40 days to remove all water.
- The body was then washed and anointed with oils while the Priests chanted and sang blessings.
- The body was stuffed with herbs, spices, linen, sawdust and salt - this helps the body have normal proportions instead of just looking like a shrunken raisin.
- The head and neck were wrapped in linen
- The fingers and toes were wrapped in linen
- The rest of the body was wrapped in linen (all of these wrappings also included little amulets being wrapped as well.)
- The linen was sealed with a resin (like tree sap)
- The face of the mummy was painted with gold to represent the kings face
- The mummy was then placed in 3 coffins which (after the funeral) were then lowered into the sarcophagus.
Step 2 - we pretended to remove the organs
Step 3 - we covered our 'body' for 40 minutes (1 minute = 1 Egyptian day)
Step 7 - we had to simulate since our dolls didn't have fingers and toes.
Step 9 - We sealed our linen with a home made version of Plaster of Paris - 1 cup warm water and 2 cups flour (we made sure our mixture was a bit more watery than regular glue so our cheese cloth strips could be hardened.)


Spring Garden
Ok I'm the first to admit that up until now I've had a black thumb. But that doesn't stop me from trying! I'm nothing if not adventurous!
This year we are trying to go even more green by starting container vegetable & herb gardens. We live in an apartment with little to no yard space, so planting an extensive garden is out of the question. But the boys are very excited to see something tangible come from our efforts (we hope..lol). We are also learning about making our own compost. This too is our way of going green.
Container Garden -
Prep:
Prep -
This year we are trying to go even more green by starting container vegetable & herb gardens. We live in an apartment with little to no yard space, so planting an extensive garden is out of the question. But the boys are very excited to see something tangible come from our efforts (we hope..lol). We are also learning about making our own compost. This too is our way of going green.
Container Garden -
Prep:
- Building the Window box with dad & papa - using recycled wood we have found the kids are building these things. We also make sure there are a few holes in the bottom so we don't drown the poor plants.
- Decorate the boxes. We have tons of paint and sealant once the kids are done decorating we'll throw on a few layers of sealant to be sure none of the pain washes away.
- Start seedlings. I know many people just plant the seeds in the boxes but I'm not the best gardener, so I'm learning along with my boys. We are starting the seedlings in the biodegradable little seedling starters in our home. We are using egg shells as our planters - the kids will be decorating them and starting the seeds with their HS group in a couple of weeks. (just click on the pic if you think you need directions)
- Once the seeds have germinated and sprouted a bit, we'll transfer the whole thing (egg and all) into the window box. I have a plastic liner for the boxes that I got for like $1. Again there are several holes in the bottom of the planter and we start filling it with a layer of gravel/rocks the kids have been collecting.
- I always throw a bit of grass starter over the top as well, so even while the little plants are growing or after harvest, there is something in the box.

- Box 1 - cucumber (space master), tomato (red Cherry), parsley & chives
- Box 2 - carrots (short & sweet), lettuce (bibb) & peppers (sweet banana), Mint & Thyme
- Box 3 - Greenbeans (french dwarf), Cabbage (Bok Choy), Sage &Basil
- Box 4 - Cabbage (baby head) , Tomato (sweet 100), Peas (Early Patio), Rosemary
Prep -
- Select a plastic storage bin that has a top that locks on (this will help keep hungry critters away) - we used the 18 gallon size. NOTE - you need 2 tops although only 1 has to be able to lock on. The other goes under the container to catch the liquid that drains out, you'll need to re add it back to the compost and if you don't have any type of catch bin then it's totally wasted.
this is like the one we used.
- Drill about a million holes through all the sides top and bottom. Air circulation is a major part of decomposition, so you need it to be able to flow through your container. (first i had the kids paint the container until it was all purrty and I sprayed a sealant onto it to keep the paint from washing off, it will eventually chip/fade but the kids had a great time). The holes should be about 1-2 inches apart.
- I then lined the bottom of the bin with a layer of gravel, then added a small amount (like a large pail worth) of rich soil, shredded newspaper and dried leaves. (but be careful on adding too much of the paper and leaves as these will help dry the contents of the bin, and you need it to stay fairly moist)
- Whenever adding scraps to the bin, be sure to chop them small, otherwise they can take quite a while to decompose (trust me, our first batch was a big moldy mess). Great things to add to your compose? - leaves, weeds, fruit and vegetable peels, egg shells, coffee grounds, tea bags, and grass clippings.
- Storing your bin. I actually keep a small pail in my kitchen where I can easily add scraps throughout the day, then before bed I add them to the bin. Some suggest keeping the bin just outside your door for ease of use, but I warn you, the smell of decomposition isn't pleasant. I keep my bin under my porch so I don't have to think about such things. After I add my daily pail, I put the lid back on then give the whole bucket a few shakes to mix things up. When I add my contents I also check to make sure everything in the bin is moist, if it's dry then I add a bit of water (like watering a plant). Maybe once every couple of weeks I add the drippings back into the bin so not much added water is necessary unless you live in a really dry environment.
- I use some chicken wire mesh to harvest my compost. Once you can see dark crumbly material, you are ready to harvest. Basically I get 2 large buckets. I lay the mesh over the bucket for the 'good material' and leave the other bucket for the 'not quite ready material'. Then I scoop the compost over the mesh. Everything small enough to fall into the bucket is good to use, the larger pieces go back to the compost bin to continue the process.
- When I put the remaining items back into the bin to complete the process I also add a scoop or two of soil again to help the balance factor (see below).
- Think of Balancing Greens and Browns in your compost - this will balance the microbes and make compost possible. The greens will be veggie & fruit scraps, plant clippings, coffee grounds, etc. The brown are dead flowers, dry leaves, small twigs (think the stuff on the forest floor), that's why I like to add a bit of rich soil to my mix.
- Adding Worms. Worms help speed up the composting process, and some can live happily in our 18 gallon drum of compost. The most common for our type of composting are Red Wigglers (you can purchase them online). Just be mindful of the temperature. Worms are happiest between 40 and 80 degrees F. If it's boiling outside then your closed bin might get very hot and kill off all your little warriors. If you use worms in your bin this is called Vermicomposting.
Subscribe to:
Posts (Atom)