Last week was lots of fun in our house. We built our Trebuchet's, and we learned about Pompeii and the boys built a volcano (one where the lava will glow in the dark!) we also did spring cleaning a bit early, but the weather has been more similar to late Spring than late Winter (it is going to be nearly 80!)
At co-op the kids wrapped up filming for their music video, it was so fun!
The boys also learned about fractions and decimals, and how to manipulate them...
AND they learned a little bit about Pi since this past Wednesday was Pi Day - i think they were sad to realize this did not mean they would be EATING pie....lol...
The boys have also been working on writing and illustrating their own story book. I am so proud of them, especially Daniel. These stories are really good! I will post them when they are finished.
Lastly, the boys have been learning about Morse code and today they are building a Morse Code machine, like those used by our military! They are excited...
We are hoping to finish our presentations for the International Geography fair which is comming in a few weeks.
Monday, March 19, 2012
Sunday, March 18, 2012
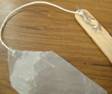
The Trebuchet
Ok, as promised, here is the instruction for building a mini Trebuchet. The whole class had a great time building them. I experimented w/ different kinds of glue. The tricky think is the arms, they need to stand upright which means holding them in place until the glue is strong enough to prevent them from falling down. So, my recommendation is either hot glue (which would mean a parent doing the gluing) or quick dry wood glue. With the wood glue, the kids can apply it and hold the piece together for a minute or so, just until it is a bit tacky and the arm doesn't fall over.
What was a Trebuchet?
The catapult was invented during the time of the Romans and the Ballista was invented by the Greeks. After the fall of Rome the French were some of the strongest fighters. But, this is the time of the castle. In order to defeat an army that is behind 20 foot high, 6 foot thick stone walls, the approaching army needed some means of attacking the safe populace. The old catapult and ballista wasn't strong enough to propel things the distance and weight required. Thus the invention of the Trebuchet. Armies would surround a castle, cutting off supply routes, and use the trebuchet to throw diseased animals, burning rubbish, rocks, and eventually explosives, over the walls. The process was called a siege (attaching a castle) and the trebuchet was considered one of the most effective siege engines before the invention of the cannon/gun.
How did a Trebuchet work?
Really it all comes down to Terrestrial gravitation. A catapult worked by winding a chord or part of the machine to build force. The trebuchet generally was weighted on one end. The 'bucket' end was hooked in place to be filled. Then the soldier would release the hook and the weight would fling the arm upright. Then it was up to the momentum and gravity that would carry the material to its destination. This was way more effective than the catapult. The catapult distance and height (trajectory) was really based on how many turns soldiers could make in the chord. The more twisted the chord the more 'umph' behind the projectile. Therefore they were limited by the strength of their men, and it would take time to twist the chord and load the projectile. The trebuchet could project up to 300lb stones! Which was 5 or 6 times that of the strongest catapult. It only took a stone of about 50 or 60 lbs to damage the strongest stone wall of a castle or tower. The other difference from a catapult was the end design. A catapult had a hollow or cup shaped end, where soldiers would place the projectile in that hollow. A trebuchet had a sling, this upped the amount of momentum and centripetal force behind the projectile. Changing from a cup to a sling effectively doubled the power behind the projectile.
Building a Trebuchet:
Supplies -
* Glue (hot or wood, NOT superglue) * 1x3 inch rectangle of a plastic shopping bag.
* about 20 Popsicle sticks. * string
* Fishing weights. * fishing wire
* Small bounce ball * power drill
* 1 finishing nail. * regular school glue
* 1 metal paper clip
Process -
1. Cut about 5 Popsicle sticks in half
2. Glue 2 Popsicle sticks, with one of the short sticks in the middle. This will become the throwing arm.Set aside to dry.

3. using 6 Popsicle sticks, make the base gluing 4 sticks into a square, then using 2 more to reinforce 2 sides.
4. Make the arms. Glue 2 Popsicle sticks together. Set aside to dry.
5. Finish the throwing arms, inset a Popsicle stick into the open end of the arm. Changing the length will Change the distance. A great side project is to determine the exact length that will produce the maximum throwing distance for the projectile you want to throw.

6. Arm Cross Beams. This is one of the trickiest and yet most important parts of the Trebuchet. Don't be stingy on the glue, make sure they are VERY strong to prevent breakage. Using 2 of the 1/2 pieces glue one so it will be parallel to the table when upright, the other is a support beam.Set aside (w/ something under the cross beam) to dry completely.
 7. Once arms are dry, glue them upright opposite each other on the base. This is the trickiest part. I prefer hot glue for this. Apply the glue and hold in place till the glue is set enough to support them as you work on them.

8. Arm structural supports. Using 2 1/2 Popsicle sticks, angle them at the base of the arms, gluing them to the base. You want these bases of the arms to be strong to deal with the vibration and force of each throw.

9. Cut the ends of the plastic rectangle to diamond points.
10. Cut one sting to be 3 inches, cut another one to be about 31/2 inches. Tie a mini circle in the end of the longer string.
11. Glue the ends of the strings onto the pointed ends of the plastic to make basket.
12. Straighten the paperclip, then bend it into a J
13. Glue the paper clip so the top of the J sticks off the end of the throwing arm just a little bit (about 1/4 inch) Also glue the non-knotted basket string to the throwing arm. (When loading the Trebuchet to throw, you slip the circle knot over the end of the paper clip.)
14. Drill 2 holes in the thick end of the throwing arm. One at about 1/4" the other at about 3/4" from the end. Be careful not to split the wood!
15. Insert the nail through the 3/4" hole (the hole closer to the middle of the arm)
16. Using PLENTY of glue, glue the ends of the nail to the cross beams. This is is the most vulnerable part of the Trebuchet.

17. Using fishing wire, feed the wire through the open hole on the end of the throwing arm. Slip fishing weights onto the string and tie. You could glue the ends of the wire to the throwing arm, but I like to keep them free so we can experiment with the weights, adding more.

18. Wait until all the glue is totally dry before using!!
To use your trebuchet, hold the arm to the 'basket' is on the table. Load paper balls, bouncy balls, whatever, into the basket. Slip the circle knot over the end of the paper clip. Do a countdown then let the arm go!
Experiment with the counter weight, and see if you can make your Trebuchet throw things higher, or longer, or heavier!
What was a Trebuchet?
The catapult was invented during the time of the Romans and the Ballista was invented by the Greeks. After the fall of Rome the French were some of the strongest fighters. But, this is the time of the castle. In order to defeat an army that is behind 20 foot high, 6 foot thick stone walls, the approaching army needed some means of attacking the safe populace. The old catapult and ballista wasn't strong enough to propel things the distance and weight required. Thus the invention of the Trebuchet. Armies would surround a castle, cutting off supply routes, and use the trebuchet to throw diseased animals, burning rubbish, rocks, and eventually explosives, over the walls. The process was called a siege (attaching a castle) and the trebuchet was considered one of the most effective siege engines before the invention of the cannon/gun.
How did a Trebuchet work?
Really it all comes down to Terrestrial gravitation. A catapult worked by winding a chord or part of the machine to build force. The trebuchet generally was weighted on one end. The 'bucket' end was hooked in place to be filled. Then the soldier would release the hook and the weight would fling the arm upright. Then it was up to the momentum and gravity that would carry the material to its destination. This was way more effective than the catapult. The catapult distance and height (trajectory) was really based on how many turns soldiers could make in the chord. The more twisted the chord the more 'umph' behind the projectile. Therefore they were limited by the strength of their men, and it would take time to twist the chord and load the projectile. The trebuchet could project up to 300lb stones! Which was 5 or 6 times that of the strongest catapult. It only took a stone of about 50 or 60 lbs to damage the strongest stone wall of a castle or tower. The other difference from a catapult was the end design. A catapult had a hollow or cup shaped end, where soldiers would place the projectile in that hollow. A trebuchet had a sling, this upped the amount of momentum and centripetal force behind the projectile. Changing from a cup to a sling effectively doubled the power behind the projectile.
Building a Trebuchet:
Supplies -
* Glue (hot or wood, NOT superglue) * 1x3 inch rectangle of a plastic shopping bag.
* about 20 Popsicle sticks. * string
* Fishing weights. * fishing wire
* Small bounce ball * power drill
* 1 finishing nail. * regular school glue
* 1 metal paper clip
Process -
1. Cut about 5 Popsicle sticks in half
2. Glue 2 Popsicle sticks, with one of the short sticks in the middle. This will become the throwing arm.Set aside to dry.
3. using 6 Popsicle sticks, make the base gluing 4 sticks into a square, then using 2 more to reinforce 2 sides.
4. Make the arms. Glue 2 Popsicle sticks together. Set aside to dry.
5. Finish the throwing arms, inset a Popsicle stick into the open end of the arm. Changing the length will Change the distance. A great side project is to determine the exact length that will produce the maximum throwing distance for the projectile you want to throw.
6. Arm Cross Beams. This is one of the trickiest and yet most important parts of the Trebuchet. Don't be stingy on the glue, make sure they are VERY strong to prevent breakage. Using 2 of the 1/2 pieces glue one so it will be parallel to the table when upright, the other is a support beam.Set aside (w/ something under the cross beam) to dry completely.
8. Arm structural supports. Using 2 1/2 Popsicle sticks, angle them at the base of the arms, gluing them to the base. You want these bases of the arms to be strong to deal with the vibration and force of each throw.
9. Cut the ends of the plastic rectangle to diamond points.
10. Cut one sting to be 3 inches, cut another one to be about 31/2 inches. Tie a mini circle in the end of the longer string.
11. Glue the ends of the strings onto the pointed ends of the plastic to make basket.
12. Straighten the paperclip, then bend it into a J
13. Glue the paper clip so the top of the J sticks off the end of the throwing arm just a little bit (about 1/4 inch) Also glue the non-knotted basket string to the throwing arm. (When loading the Trebuchet to throw, you slip the circle knot over the end of the paper clip.)
15. Insert the nail through the 3/4" hole (the hole closer to the middle of the arm)
16. Using PLENTY of glue, glue the ends of the nail to the cross beams. This is is the most vulnerable part of the Trebuchet.
17. Using fishing wire, feed the wire through the open hole on the end of the throwing arm. Slip fishing weights onto the string and tie. You could glue the ends of the wire to the throwing arm, but I like to keep them free so we can experiment with the weights, adding more.
18. Wait until all the glue is totally dry before using!!
To use your trebuchet, hold the arm to the 'basket' is on the table. Load paper balls, bouncy balls, whatever, into the basket. Slip the circle knot over the end of the paper clip. Do a countdown then let the arm go!
Experiment with the counter weight, and see if you can make your Trebuchet throw things higher, or longer, or heavier!
Wednesday, March 14, 2012
Medieval History Fun
As usual i've over extended myself..lol.. I agreed to teach a medieval history class. Since the class can be a lot of lecture while i read through books like Usborne Medieval History ans Story of the World, i decided the kids would focus on making their own authentic period costume. The girld made brats & wimples. The boys made cooky hats. All the kids made tabards w/ a collar they decorated (as if it were embroidered). They also made swords, trebuchet's etc.
I'll post some pics later today. We are planning a tournament for the last class. Should be fun!!
I'll post some pics later today. We are planning a tournament for the last class. Should be fun!!
Saturday, March 10, 2012
Ahh, February is FINALLY over......
February was quite possibly the worst month i have had in a long time. With my vascular issues, changing seasons can be a tough time for me. Usually i'm in pain in March or April, but with the unusually mild winter we have had in the North East, we are going from Spring to Winter over and over. So, for most of Feb, i was confined to my bed.
I've heard from thousands of new HS'ers. Some have medical isues like i do, others are dealing with rough pregnancies, anxiety, depression, etc. many of these mom's stuggle to home educate during these times, then stess out that they are failing.
Here are my Top 5 Tips to dealing with complications to HS like these:
1) Take some time off!! IMO, you could take off up to 3 months a year and still be getting more education than PS kids. If you are stressed out, then you probably wont have the patience to be an effective teacher. Don't sweat it, take some time to heal/recover and you will be that much more effective when you're recovered.
2) Sign up for independant computer learning programs like www.theheadoftheclass.com or www.time4learning.com this will keep the kids into the routine of 'school' without your brain and body being overwhelmed by having it all on your shoulders. I don't like these programs as stand alone curriculums, but they are fine for a few months.
3) Learning Baskets. When i was on bedrest AND suffering with hyponemis (so i lost 25 lbs) i was exhausted & miserable, so not the best teacher ever. But, especially during my pregnancy when my oldest was 3.5 y/o, i couldn't just leave him infront of a computer. (aside from using time4learning on the laptop next to me) i kept stocked education baskets next to my bed & couch. These baskets were packed with coloring materials that coincided with a book (also in the basket), educational movies, etc. I really only had to exhert myself by reading the book, then popping open the crayons.
4) School Year Round. My medical condition is chronic, so i always have to plan for events like Feb - where i might be in too much pain to teach. By schooling year round we only have do school for an hour or two a day. And i don't have to deal with the stress of feeling like a failure for taking some time off - most PS schools Take off all summer!
5) Ask for help!! Let's face it. As HS'ers we spend a lot of time telling people we are good enough to be the kids main source for education (even though most of us struggle with doubt from time to time). Therefore, asking for help from someone (even a spouce), can feel like you are conceding defeat and admiting to failure. But that is not the case. There is nothing wrong from giving your DH the math assignment the kids need to learn.
Plan for every eventuality, and don't stress. It will all work out. I took nearly 1/2 a year off from formal learning when i had my youngest. I just made sure the kids had tons of videos, art supplies, etc. basically we were unschoolers while i was exhausted and nursing.
You can accomodate any complication as long as you plan ahead!
Hugs & Blessings!
Subscribe to:
Posts (Atom)